To Open Different Activity on RecyclerView Item OnClick
Step 1 − Create a new project in Android Studio, go to File ⇒ New Project, and fill in all required details to create a new project.
Step 2 − Open activity_main.xml FIle And Add The Following Code:-
<?xml version="1.0" encoding="utf-8"?>
<RelativeLayout xmlns:android="http://schemas.android.com/apk/res/android"
    xmlns:app="http://schemas.android.com/apk/res-auto"
    xmlns:tools="http://schemas.android.com/tools"
    android:layout_width="match_parent"
    android:layout_height="match_parent"
    tools:context=".MainActivity">


<androidx.recyclerview.widget.RecyclerView
    android:layout_width="match_parent"
    android:layout_height="wrap_content"
    android:id="@+id/recycle"
    />


</RelativeLayout>
Step 3 −Create One Row_Item FIle
<?xml version="1.0" encoding="utf-8"?>
<androidx.cardview.widget.CardView
    xmlns:android="http://schemas.android.com/apk/res/android"
    xmlns:app="http://schemas.android.com/apk/res-auto"
    android:layout_width="match_parent"
    android:layout_height="120dp"
    android:layout_marginLeft="20dp"
    android:layout_marginTop="10dp"
    android:layout_marginRight="20dp"
    android:orientation="vertical"
    app:cardCornerRadius="10dp">


    <RelativeLayout
        android:id="@+id/layout_id"
        android:layout_width="match_parent"
        android:layout_height="124dp">

        <ImageView
            android:id="@+id/courseImg"
            android:layout_width="50dp"
            android:layout_height="120dp"
            android:src="@drawable/ic_launcher_background" />

        <TextView
            android:id="@+id/courseName"
            android:layout_width="match_parent"
            android:layout_height="wrap_content"
            android:layout_marginLeft="30dp"
            android:layout_marginTop="40dp"
            android:layout_toRightOf="@+id/courseImg"
            android:text="Course Name" />

        <TextView
            android:id="@+id/courseDesc"
            android:layout_width="match_parent"
            android:layout_height="wrap_content"
            android:layout_below="@id/courseName"
            android:layout_marginLeft="30dp"
            android:layout_marginTop="8dp"
            android:layout_toRightOf="@+id/courseImg"
            android:text="Description" />


    </RelativeLayout>

</androidx.cardview.widget.CardView>
Step 3 - Create One CourseAdapter.java File
package com.c.recyclerviewdemo;

import android.content.Context;
import android.content.Intent;
import android.view.LayoutInflater;
import android.view.View;
import android.view.ViewGroup;
import android.widget.ImageView;
import android.widget.RelativeLayout;
import android.widget.TextView;

import androidx.annotation.NonNull;
import androidx.recyclerview.widget.RecyclerView;

import java.util.List;

import static android.content.Intent.FLAG_ACTIVITY_NEW_TASK;

public class CourseAdapter extends RecyclerView.Adapter<CourseAdapter.CourseViewHolder> {

    List<CourseModel> course_List;

    private Context context;

    public CourseAdapter(List<CourseModel> courseList, Context context)
    {
        course_List=courseList;
        this.context=context;
    }

    @NonNull
    @Override
    public CourseAdapter.CourseViewHolder onCreateViewHolder(@NonNull ViewGroup parent, int viewType) {

        View view= LayoutInflater.from(parent.getContext()).inflate(R.layout.rowitem,parent,false);
        CourseViewHolder courseViewHolder=new CourseViewHolder(view);

        return courseViewHolder;
    }

    @Override
    public void onBindViewHolder(@NonNull CourseAdapter.CourseViewHolder holder, int position) {

        holder.courseImage.setImageResource(course_List.get(position).Imgid);
        holder.course.setText(course_List.get(position).name);
        holder.coursedes.setText(course_List.get(position).des);
        holder.relativeLayout.setOnClickListener(new View.OnClickListener() {
            @Override
            public void onClick(View view) {
                Intent intent=new Intent(context.getApplicationContext(),CourseDetails.class);

                intent.putExtra("Img",course_List.get(position).Imgid);
                intent.putExtra("Name",course_List.get(position).name);
                intent.putExtra("Desc",course_List.get(position).des);
                intent.addFlags(FLAG_ACTIVITY_NEW_TASK);
                context.getApplicationContext().startActivity(intent);


            }
        });

    }

    @Override
    public int getItemCount() {
        return course_List.size();
    }


    public class CourseViewHolder extends RecyclerView.ViewHolder {

        TextView course,coursedes;
        ImageView courseImage;
        RelativeLayout relativeLayout;


        public CourseViewHolder(@NonNull View itemView) {
            super(itemView);

        course=itemView.findViewById(R.id.courseName);
        coursedes=itemView.findViewById(R.id.courseDesc);
        courseImage=itemView.findViewById(R.id.courseImg);
        relativeLayout=itemView.findViewById(R.id.layout_id);

        }
    }
}
Step 4 - Create One Model Class Name As CourseModel.java
package com.c.recyclerviewdemo;

public class CourseModel  {

    int Imgid;
    String name;
    String des;

    public CourseModel(int imgid, String name, String des) {
        Imgid = imgid;
        this.name = name;
        this.des = des;
    }

    public int getImgid() {
        return Imgid;
    }

    public void setImgid(int imgid) {
        Imgid = imgid;
    }

    public String getName() {
        return name;
    }

    public void setName(String name) {
        this.name = name;
    }

    public String getDes() {
        return des;
    }

    public void setDes(String des) {
        this.des = des;
    }
}
Step 4 - In MainActivity.java File Add This Code
package com.c.recyclerviewdemo;


import androidx.appcompat.app.AppCompatActivity;
import androidx.recyclerview.widget.LinearLayoutManager;
import androidx.recyclerview.widget.RecyclerView;

import android.os.Bundle;

import java.util.ArrayList;
import java.util.List;

public class MainActivity extends AppCompatActivity {

    RecyclerView recyclerView;
    List<CourseModel> courselist;

    @Override
    protected void onCreate(Bundle savedInstanceState) {
        super.onCreate(savedInstanceState);
        setContentView(R.layout.activity_main);

        recyclerView=findViewById(R.id.recycle);

        recyclerView.setLayoutManager(new LinearLayoutManager(this));
        recyclerView.setHasFixedSize(true);

        courselist=new ArrayList<>();
        courselist.add(new CourseModel(R.drawable.search,"Google","Google Is Google "));
        courselist.add(new CourseModel(R.drawable.playstore,"PlayStore","PlayStore Is PlayStore "));
        courselist.add(new CourseModel(R.drawable.gmail,"Gmail","Gmail Is Gmail "));
        courselist.add(new CourseModel(R.drawable.drive,"Drive","Drive Is Drive "));
        courselist.add(new CourseModel(R.drawable.pin,"Pin","PlayStore Is PlayStore "));
        courselist.add(new CourseModel(R.drawable.youtube,"Youtube","Youtube Is Youtube "));
        courselist.add(new CourseModel(R.drawable.slides,"Slides","Slides Is Slides "));
        courselist.add(new CourseModel(R.drawable.facebook,"Facebook","Facebook Is Facebook "));
        courselist.add(new CourseModel(R.drawable.instagram,"Instagram","Instagram Is Instagram "));
        courselist.add(new CourseModel(R.drawable.whatsapp,"Whatsapp","Whatsapp Is Whatsapp "));
        courselist.add(new CourseModel(R.drawable.telegram,"Telegram","Telegram Is Telegram "));
        courselist.add(new CourseModel(R.drawable.linkedin,"Linkedin","Linkedin Is Linkedin "));


        CourseAdapter adapter=new CourseAdapter(courselist,this);
        recyclerView.setAdapter(adapter);


    }
}
Step 5 - Create New Java File Name As CourseDetails.java File
package com.c.recyclerviewdemo;

import androidx.appcompat.app.AppCompatActivity;

import android.os.Bundle;
import android.widget.ImageView;
import android.widget.TextView;

public class CourseDetails extends AppCompatActivity {

    ImageView img;
    TextView txt,txtdes;
    @Override
    protected void onCreate(Bundle savedInstanceState) {
        super.onCreate(savedInstanceState);
        setContentView(R.layout.activity_course_details);

        img=findViewById(R.id.img);
        txt=findViewById(R.id.txt);
        txtdes=findViewById(R.id.txtDes);

        img.setImageResource(getIntent().getExtras().getInt("Img"));
        txt.setText(getIntent().getExtras().getString("Name"));
        txtdes.setText(getIntent().getExtras().getString("Desc"));


    }
}
Step 6 - And Add Code In CourseDetails.xml File
<?xml version="1.0" encoding="utf-8"?>
<LinearLayout
    xmlns:android="http://schemas.android.com/apk/res/android"
    xmlns:app="http://schemas.android.com/apk/res-auto"
    xmlns:tools="http://schemas.android.com/tools"
    android:layout_width="match_parent"
    android:layout_height="wrap_content"
    tools:context=".CourseDetails"
    android:orientation="vertical"
    >

    <ImageView
        android:layout_width="match_parent"
        android:layout_height="wrap_content"
        android:src="@drawable/search"
        android:layout_marginLeft="50dp"
        android:id="@+id/img"
        android:layout_marginRight="50dp"
        />

    <TextView
        android:layout_width="match_parent"
        android:layout_height="wrap_content"
        android:id="@+id/txt"
        android:text="Android"
        android:layout_marginRight="50dp"
        android:layout_marginLeft="50dp"
        android:textSize="20dp"
        android:textStyle="bold"
        />

    <TextView
        android:layout_width="match_parent"
        android:layout_height="wrap_content"
        android:id="@+id/txtDes"
        android:text="@string/course_desc"
        android:layout_marginRight="50dp"
        android:layout_marginLeft="50dp"
        android:textSize="12dp"
        />

</LinearLayout>
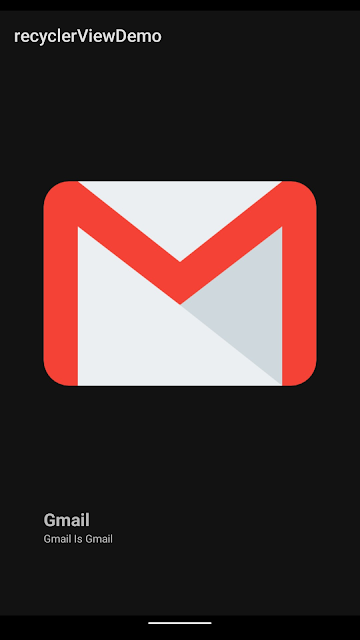
Step 7 - Just Run The Code.





0 Comments